romantic and elegant
Lace Wedding Veil Tutorial

Welcome
Refresh the page to watch the videos
Select your veil length & decide if you want a blusher


veil with blusher

veil without blusher
Please refresh the page to see the videos.
1.Supplies
Click the button below to download a list of supplies you’ll need to make your wedding veil. The color and weight of the lace on the veil need to be in harmony with your wedding outfit. You don’t need to match the lace exactly but you’ll want to select a similar style.
There are 2 main color categories: cool white and warm white. The image below shows a cool white fabric sitting on top of a warm white fabric. The difference between the colors becomes very noticeable in photography.

Lace and tulle come in a range of colors. Stay in the same color family as your dress when making your veil. For example, if your dress is a warm white, select materials in the warm white range. Either a diamond white or an ivory color will work. Similarly, if your dress is a cool white, then the tulle and lace need to be cool white.
The Giupure Lace in the picture below is a cool white. The Chantilly Lace is a warm white while the Aleçon Lace is ivory.

You’ll also want your lace to have a similar weight as the lace on your dress. A Chantilly lace feels very delicate and is best matched with another delicate lace. Conversely, Guipure lace makes a bolder statement so your veil needs a bolder lace. Similarly, if the lace on your dress is beaded, you may want to select a beaded lace for your veil.
2.Length
You’ll need to determine how much tulle you’ll need for the veil and then you’ll calculate the corresponding lace. What veil length are you interested in? Consider where the veil will be placed on your head and if you want a blusher.
Tulle comes in two widths: 54″ and 108″. The 54-inch-wide tulle works for shorter veils, while the 108″ width tulle is needed for longer veils. You can adjust the measurements in the illustration to ensure everything fits you perfectly.
Click on the button below to see the pattern for both options.
3.Calculations
As explained in the video, the circumference is the measurement of the outer edge of the circle and is calculated using the formula 2πr. Think back to high school and remember that π = 3.14 and r is the radius of the circle that you are cutting. However, if you are making an oval veil, the easiest way to determine the amount of lace, is to use the formula for the circumference of a rectangle. Measure 2 times the length, and add it to 2 times the width (2L + 2W). This will give you about 10% more lace than is needed but it will be easier than breaking out the advanced mathematics.
4.Ironing
Your tulle will probably have folds from being stored and wrapped on a bolt. It’s much easier to remove the folds by ironing the material before you make your wedding veil. In this video, I demonstrate how to quickly and easily iron your fabric. Hint, it’s all about using lots of steam. If you are ironing on a wooden table, I recommend placing a cutting mat over the wood and covering the mat with a thick towel so the steam doesn’t damage or warp the wood.
5.Cutting
In this video, you’ll learn how to cut the tulle for your veil. You’ll need lots of straight pins and some patience. I like the colored glass-head pins as they are easy to see in the tulle. Determine how long you want your veil to be. Then fold the tulle in half width-wise. Use pins to match up the two sides. Now fold the tulle in half length-wise. Secure all four layers with the pins. This will ensure that the tulle doesn’t move when you cut it.
Remember to double-check your measurements. Measure twice, cut once is a fabulous motto when sewing. By the way, the longer your veil, the more patience you’ll need.
Start by measuring half the length from the corner with the two folds and mark with a pin. Do this along several diagonals to create a cutting line with pins to follow. Insert the pin into the tulle twice (in-out-in-out) so it doesn’t move. Cut the tulle and save the edge of the tulle as you will need it for the comb.
6.Lace
You’ll need embroidery scissors and some patience. It is helpful to watch this video on full screen to see the details. Some lace has a top and bottom repeat so you only need to purchase half the amount but you will have to factor in matching the lace to ensure you purchase sufficient quantity. An elaborate piece of lace was used in this video to demonstrate the technique. The most important thing to remember is to be consistent and always follow the same part of the lace when you cut.
7.Matching
This video explains how to match pieces of lace. You may only need to match the beginning of the veil to the end, or you may need to match up multiple pieces along the edge of your veil. An elaborate piece of lace was used for demonstration purposes.
The image below provides close-up of the matching process discussed in the video.

When adding a new piece of lace, overlap part of the design to create a seamless appearance. Secure the top of one piece to the bottom of the second piece using pins. The pins will hold the lace together until you can sew the pieces. Sew using a single thread and tiny stitches. Match and sew the lace together before you attach it to the veil.

8.Embellishing
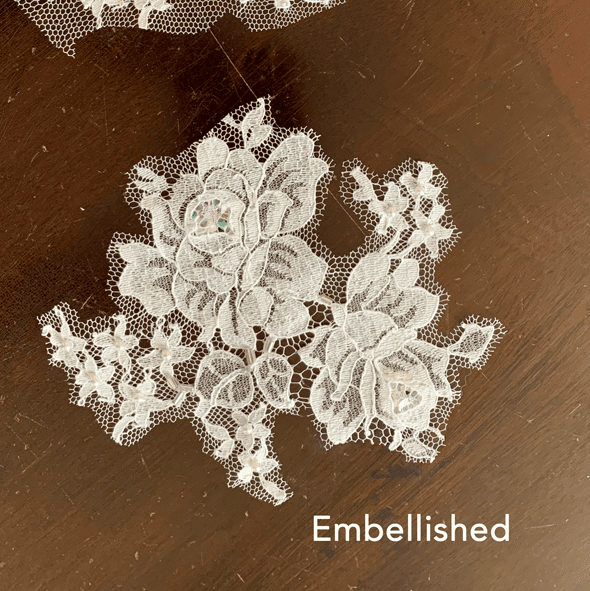
Embellishing lace can add a personal touch and save money. It is best done before you attach the lace to the tulle. There are many options to consider. Pearls can offer a classic touch of elegance, while beads and crystals can add a shimmer. This video explains how to embellish your lace with pearls, beads, and sequins. When attaching sequins, consider embellishing the reverse side for a more discrete touch of sparkle.
The image below provides a close-up of possible embellishments for your lace.
9.Basting
You’re now ready to attach the lace to the edge of the tulle. First, you pin the lace to the tulle. Then you baste the lace to the tulle using large quick stitches. Basting is a temporary stitch and will be removed once you sew the lace properly to the tulle. Don’t skip this step, and work in small sections. It’s necessary to ensure the lace is correctly arranged along the tulle.
A basting stitch is half an inch to one inch long.

10.Sewing
Now it’s time to permanently sew the lace to the tulle.
Use tiny in-an-out stitches in a matching thread color, and follow the design of the lace. When you first begin, determine how long the repeat of the lace is and start sewing this distance from the beginning. For example, if the design on your lace repeats every 3 inches, then you will start sewing the lace to the tulle 3 inches past the beginning of the lace. You leave the beginning basted so you can match this piece to the lace at the end.
Sew around the entire veil. When you reach the end, you’ll need to match the lace and then attach it to the tulle. Start by removing the basting stitches. Overlap the lace, match the end with the beginning, and sew the pieces together. After matching, you’re ready to attach the matched piece to the tulle.
This technique ensures you can’t tell where the lace starts and ends on the veil.
Basting stitches are half an inch to one inch long.
11.Attaching
There are several ways to attach your veil to your hair. The most popular option is with a comb but you can also use a headband. This can be a great option if you’re making a longer veil and have very fine hair.

A metal comb is the traditional way of securing your wedding veil. Look for a “twisted wire metal comb” as this will stay in your hair better than a plastic or stamped-metal comb. Look for a matte finish because the finish on a shiny comb causes it to slip from your hair. If you can only find a comb with a shiny finish, use a piece of fine sandpaper (600) to remove the finish on the comb before you wrap it in tulle. Once the comb is wrapped, you can then sew the veil to the comb.

11.Attaching – Blusher
If you want a blusher, you need to gather the veil and then attach it to your comb or headband. You’ll need needles, thread, and a little bit of patience for this step. You’ll be sewing with a double thread using a whip stitch. There is a video demonstrating this stitch along with a close-up of the stitch.
As you get close to the edge of the tulle, it can be helpful to use a pin (or two) as a guide to help you sew in a straight line. Ensure that your stitches are equal. Once the tulle is gathered, you’re ready to attach it to the comb. Locate the blusher side so that it lays on top of the comb and will cover your face. Attach the veil to the comb or headband.
The process for a headband is the same as for the comb except that you are attaching the tulle to the top of the headband. First, you sew the lace to the tulle. Then, gather the tulle to a length of about 3 inches. Distribute it across the top of the headband. Check that the gathered tulle is centered and evenly distributed on the left and the right sides of the headband. Sew the tulle to the headband which has been wrapped in tulle or embroidery thread.

The image below is a top view of the lace veil gathered on a headband with a comb. The gathered area is distributed evenly and then attached to the headband.

A piece of lace is then added to complete the gathered area.

Whip stitch demonstration

Bonus
In this video, you’ll discover how to embellish your comb. Pearls are one option that offer a classic touch of elegance and can be combined with some beads for a dash of sparkle. Before you start, test your needle to ensure that the needle goes through all the beads and pearls. Some needles may be too thick. A beading needle may fit through the beads but may not be strong enough to go through the tulle on the comb without bending.
