Bandeau Birdcage Veil Tutorial

We are thrilled that you have joined our family of DIY Brides.
Happy sewing and send pictures of your veil.
1. Supplies
Click the button below to download a list of supplies that you’ll need to make your birdcage veil. While many of the materials can be purchased from an arts and crafts supplies store, the list includes sources for veiling and trims.
Please refresh the page if you see an error message.

2. Ironing
Your veiling will probably have folds from being stored and wrapped on a bolt. It’s much easier to remove the folds by ironing the material before you start making your birdcage veil. When ironing flocked veiling, iron around the chenille pieces.
3. Measurements
Each style of birdcage veil uses a different length and width of veiling. The Bandeau that I demonstrate in the video uses 18″ of 9″ wide veiling. You might need to adjust the measurements slightly to perfectly suit your face and hairstyle.
The Bandeau birdcage veil is a sophisticated full-face accessory. You’ll want to plan your evening as you won’t be able to eat or drink while wearing your veil. Think about when to remove your veil. One option is to rearrange the veil after the ceremony across the back of your head. This will provide adornment while allowing you to eat and drink.
You could also create a bandeau birdcage veil that only covers your eyes. The drawing below showcases the three most popular lengths of birdcage veils.

4. Attachment
There are several ways to attach your birdcage to your hair. While the most popular way is to use a comb, you can also use a headband. This can be a great option if you have very fine hair or are worried about the comb slipping out. Watch both videos and decide which option is best for you.
Combs are measured according to the number of teeth. The image below shows a 6-tooth, 12-tooth, and 18-tooth comb. Look for a twisted wire metal comb as this will stay in your hair better than plastic or stamped-metal combs. You’ll need to prepare the comb by wrapping it in tulle so that the veiling can be sewn to the comb.
Metal headbands like the one in the video are 1/8″ or 3/8″ wide. A quick search shows that they are available for purchase on Amazon and Walmart. You can wrap the metal headband in tulle or with embroidery thread that matches your hair color.

5. Embellishment
You may want to add a touch of pizzazz to your birdcage veil by embellishing it. This video shows you how to add crystals to the veiling which will pick up the light in a delightful manner. If you are embellishing the veil then you’ll need to let the adhesive dry for at least 1 hour before proceeding to assemble your birdcage.
6. Assembly
It’s time to put everything together. You’ll need to gather the veiling and then attach it to the comb or headband.
As discussed in the video, use a whip stitch to gather the veiling. The stitch is similar to a running stitch but you are going around the edge of the fabric. If an edge of the veiling breaks then go through the row right below it. Use a long needle with a double thread and sew the left and right edges of the veiling. Then try it on and whip stitch the top and gather it so your veil contours your head.

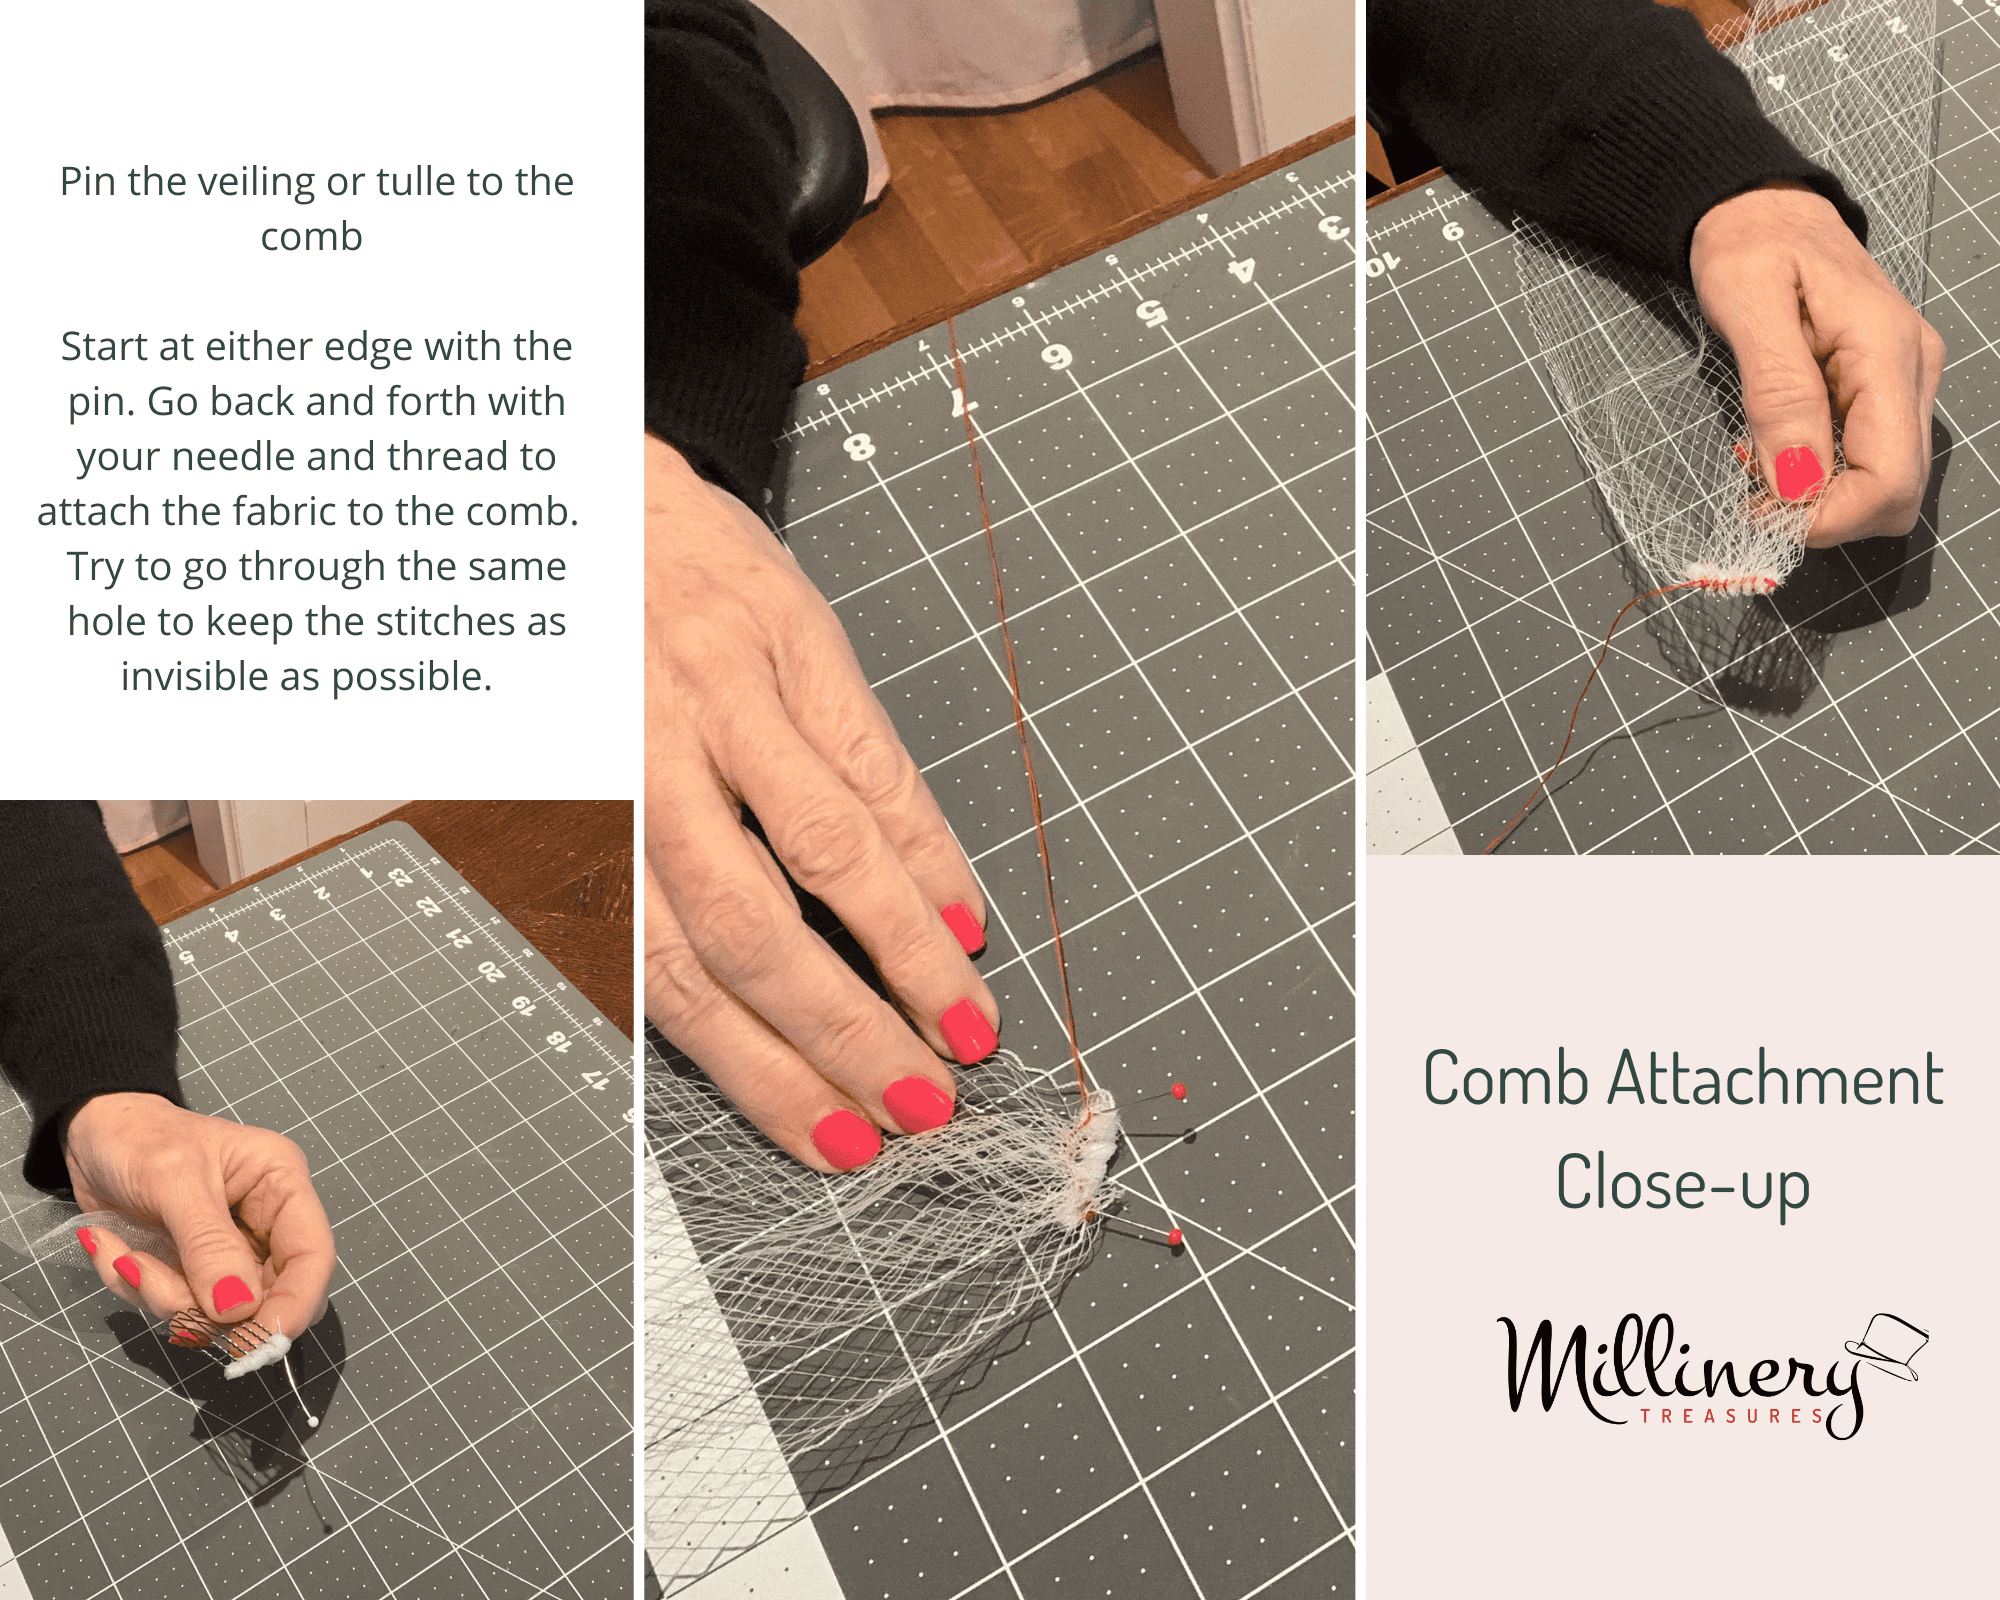
Before you sew the gathered veiling to each comb, you’ll need to wrap them with tulle. Wrap the tulle around the horizontal edge of the comb between each tooth. Start wrapping at one side and when you reach the other edge, secure the tulle with a few tiny stitches. Pin the gathered fabric on the left and right sides of the comb using straight pins. Then you’re ready to attach the veiling to the comb with small stitches.
7. Distinctive
If your vision is for something grand, you’ll want to add pearls, crystals, or bridal jewelry to your piece. This step is done after you have attached the veiling to the comb or headband. The first video demonstrates how to add pearls, while the second video incorporates bridal jewelry into the piece.
There are many places to find gorgeous embellishments that coordinate with your wedding outfit. Listed below are a few businesses with delightful products that can be shipped worldwide.
- Crystals: Fire Mountain Gems website (flat back crystals 3mm = ss12 and 4.8mm=ss20)
- Pearls: Fire Mountain Gems website (pearls are listed under beads)
- Bridal Jewelry: JJ’s House website (in accessories and then under headpieces)
- Silk Flowers: M&S Schmalberg website (bridal is under the shop tab)
- Lace: Mood Fabrics website
While the video shows how to sew pearls and crystals directly on the comb of a traditional wedding veil, the process is the same for a birdcage veil. Add the pearls one at a time, and sew each one to the tulle-wrapped comb. Slowly build up each layer of pearls. You can use all the same size of pearls or you can select from a variety of sizes. I combined 4mm, 5mm, and 8mm pearls to create an elegant effect. The image below provides close-ups of the process.

Adding bridal jewelry is a similar process to adding pearls. It’s important to proceed with this step after you assemble the birdcage so that the piece lays flat against your hair. Use pliers to cut off excess wire and bend the ends to arrange the piece. The picture below provides some close-ups.

Congratulations on completing the Bandeau tutorial. You can access the welcome page or the other birdcage tutorials by clicking on the images below.

Welcome Page
Wisp

Bejeweled
